Overview
| Anchor | ||||
|---|---|---|---|---|
|
In Data and Analytics, you can schedule reports to run at a specific time or on a recurring basis. This quick guide will instruct you how to schedule a Web Intelligence report to run (the instructions would differ slightly for Crystal Reports) and to send an email to one or more recipients.
Schedule a Report to Run
Navigate to the D&A folder in which the report is located and follow these instructions to schedule the report to run.
- Right-click on the report name.
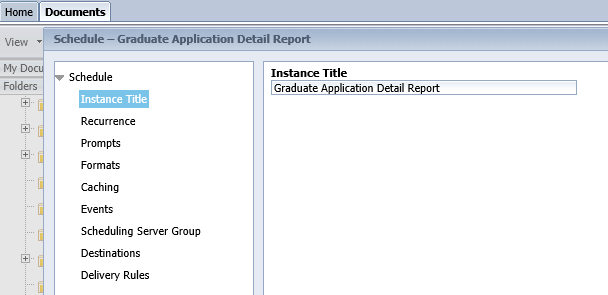
- Select Schedule from the menu options. The Schedule window will open with Instance Title initially selected. See Figure 1.
Figure 1: Schedule, Instance Title page. Click image to enlarge. Set the Instance Title field to your desired title.
Note title Tip Setting a unique Instance Title for each job you schedule will help you identify the specific job when viewing the History list at a later time.
Click Recurrence in the Schedule menu in the left panel. The Recurrence page will populate in the right panel.
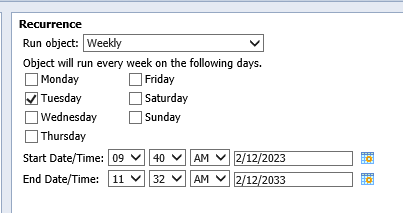
From the Run Object drop-down menu in the right panel, select the recurrence frequency and fill out the options which you are then presented with. If you choose to keep the default option of Now, then you will not have to specify anything further here and may skip to step 6. Once then you can usually ignore the End Date/Time fields. The example in Figure 2 shows how to specify a job to run weekly on Tuesdays at 9:40AM for the next 10 years.
Figure 2: Schedule, Recurrence page. Click image to enlarge.- Click Prompts in the Schedule menu in the left panel. The Prompts page will populate in the right panel. If the report document does not use prompts or if the default values displayed are appropriate, then you may skip to step 8. Otherwise, click the Modify button in the right panel to open the Prompts window.
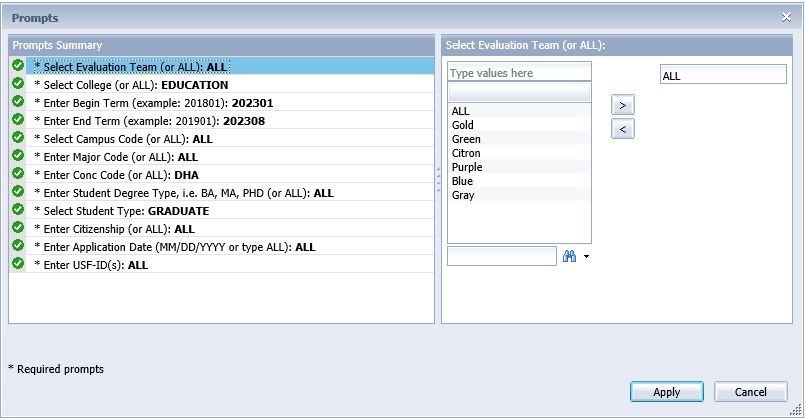
- In the Prompts window select, enter, or adjust each prompt to meet your needs before clicking the Apply button. See Figure 3.
Figure 3: Prompts window. Click image to enlarge. Click Formats in the Schedule menu in the left panel. The Formats page will populate in the right panel. Move the checkmark to the box corresponding to the format in which you wish to receive the results (ex. Microsoft Excel or Adobe Acrobat).
Note title On-Screen Viewing FormatIf you wish to view the results as if you had populated the report on-screen within D&A, then you may choose to leave the default Web Intelligence box checked. However, you will have to be logged into D&A in order to view those results. If in step 5 you chose Now and you wish to view the results on-screen as soon as the data can populate, then in step 10 you may simply leave the Destination set to Default Enterprise Location, then click the Schedule button at the bottom (step 15), and then wait for the History window to show that the Status of your instance is Success. As a final step, you simply click on the Title you designated in step 3 to view the results on-screen.
Click Destinations in the Schedule menu in the left panel. The Destinations page will populate in the right panel.
- Change the Destination drop-down menu to Email.
- Leave the checkmark in the "Keep an instance in the history" checkbox.
Type your own email address in the To: field.
Warning title Sensitive Data Emails from D&A are not encrypted. If the report results include any sensitive data (especially if that data requires authorization from Primary Process Owners), then make yourself aware of all applicable regulations/requirements before you schedule your job. When in doubt, you should feel comfortable sending specifically to your own email address while using the %SI_VIEWER_URL% Viewer Placeholder in the Message: body INSTEAD of including an attachment (you must uncheck the Add Attachment checkbox). The email you receive would then include a hyperlink, which brings you securely back to D&A to view/download the results.
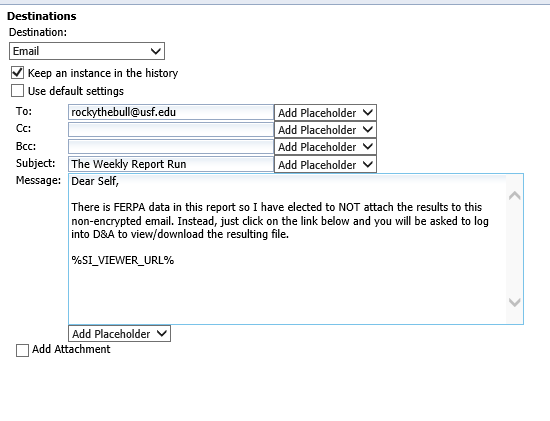
Fill in the Subject: and Message: fields. Placeholders are available via drop-down menus and those will be replaced with the applicable values after the job runs. See Figure 4.
Figure 4: Email Destination example with secure hyperlink instead of an attachment. Click image to enlarge.Uncheck the Add Attachment box if you do not intend to have sensitive data emailed in a non-encrypted manner (see Sensitive Data Warning above). For non-sensitive data, you may leave the Add Attachment box selected, and then you can choose whether to allow the system to auto-name the attachment or you can specify the name yourself. Be sure to leave the Add File Extension box checked if you want .xlsx or .pdf appended to the name of the attachment.
Note title Other Schedule Options You do not need to make any changes to settings in the Schedule options of "Caching", "Events", "Scheduling Server Group", nor "Delivery Rules".
- Click the Schedule button at the bottom right of the Schedule window.
- The History window should now be displayed. Your job should be listed at the top (compare the Title column to what you specified in step 3). If you chose Once or Now in step 5 , then the Status should change from Pending to Running to Success (or Failure). If in step 3 you instead chose to set a recurrence, then your job should be listed with Recurring under the Status. be Pending otherwise it will be Recurring. You should only be able to see instances/jobs which you yourself scheduled. Clicking on the Title or the Instance Time of an instance with a Status of Success will allow you to download (Excel/PDF) or view (Web Intelligence) the results from that point in time.
You may close the History window via the xx in the upper-right corner.
Note title Tip Some day you may want to discontinue or reschedule a recurring job if the prompts choices become obsolete over time. If you navigate back to the report and right-click the report name, you should be able to get back to the History screen from step 17. Then you can filter by the Status column to find your "Recurring" job schedule. You then right-click on the recurring job schedule in order to see options such as Pause, Run Now, Reschedule, or Organize → Delete.


