HART can be accessed with the USF health domain (on campus) or remotely (off campus). Once logged in, as a best practice, preferences should be set or verified before work is started in HART. Preferences establish how reports are viewed and worked in HART.
The following topics are covered:
HART Individual Login
If you are a HART Individual logging in through the USF Health network you will be automatically logged into HART after completing the following steps:
Launch your web browser.
NOTE
Internet Explorer 7 or 8 is the preferred browser but Firefox 3.x is also supported.- Access http://www.health.usf.edu/is/hart.html
Click HSCNET OFFICE. See figure 1 below.

Figure 1: HSCNET OFFICE Logon. Click image to enlarge.
Off Campus Login
HIPAA requires that all computers accessing the USF Health computer network from outside the USF Health firewall use a secure form of data encryption. USF Health Information Systems provides an application called Connectra for this function. In order to log in from off campus, you must have Connectra. You can download Connectra by visiting the USF Health IS website for downloads @ http://hsc.usf.edu/is/download/hipaa_downloads.htm and click on the Access Connectra Now link. Refer to Set Web Browser Preferences below to ensure that HART runs smoothly when accessing remotely.
If you are logging into HART from home and you have Connectra on your computer:
Open IE 7, IE 8 or Firefox 3.x and connect to Connectra.
Open a new browser tab once connected.
Copy past the following URL into the address field:
- Click HSCNET HOME/WIRELESS. See figure 2 below.

Figure 2: HSCNET HOME/WIRELESS. Click image to enlarge. - Log in using your HSCNET User Name and Password and Windows AD authentication.
The HART Home page will open. See figure 3 below.
Figure 3: HART Home Page/Preferences. Click image to enlarge.
Set InfoView Preferences
these preferences will need to be set or verified at the initial log in only. Changing your InfoView Interface Preferences allows you to open multiple reports in different windows.
To set your InfoView Interface Preference from the HART homepage:
- Click Preferences. See figure 3 above.
The Preferences page will open. See figure 4 below.
Figure 4: Preferences page. Click image to enlarge. - Scroll to Document Viewing options. See figure 4 above.
- Select in multiple fullscreen browser windows, one window for each document.
- Click OK.
Set Web Browser Preferences
In order to ensure that HART runs smoothly when accessing remotely, you must change a few of the default Internet Explorer preferences.
- Make HART a trusted Internet Explorer (IE) site
- Allow Pop-ups on HART
Make HART a Trusted Site on IE
- Once logged into HART, go to Tools.
- Select Internet Options. See figure 5 below.
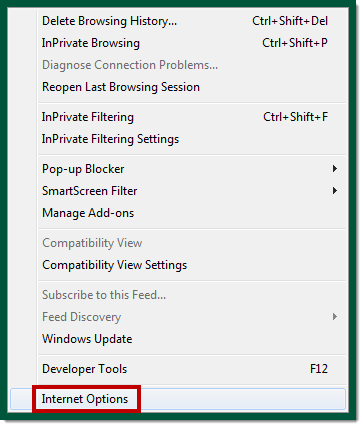
Figure 5: Select Tools, Internet Options. Click image to enlarge. - Access the Security tab and click on Trusted Sites. See figure 6 below.
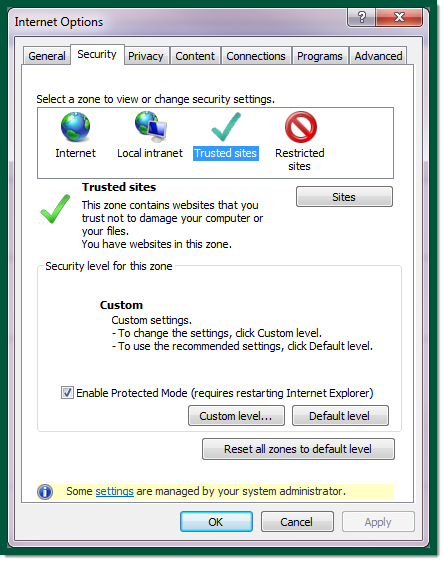
Figure 6: Setting HART Security. Click image to enlarge. - Click Sites. See figure 6 above.
The Trust Sites dialog box will open. See figure 7 below.
Figure 7: Setting HART as a Trusted Site. Click image to enlarge. - Type in https://hschart:8443/InfoViewApp/listing/main . See figure 8 above.
- Uncheck Require server verification (https:) for all sites in this zone.
- Click Add and Close.
Allow HART Pop-ups
- Click Tools.
- Select Pop-up Blocker, Pop-up Blocker settings.
- Type in the address:
- *.hsc.usf.edu - outside the USF Health firewall.
- hschart - inside the USF Health firewall.