Configuring Mozilla Thunderbird
- Kimberly Adkins
- Jessica Marshall
Overview
This guide will help you to set up a new account in Mozilla Thunderbird and instruct you on how to change settings on your existing account.
If you have never used Thunderbird with your USF email address, please contact the USF IT Service Desk for approval from the Email team to use this application.
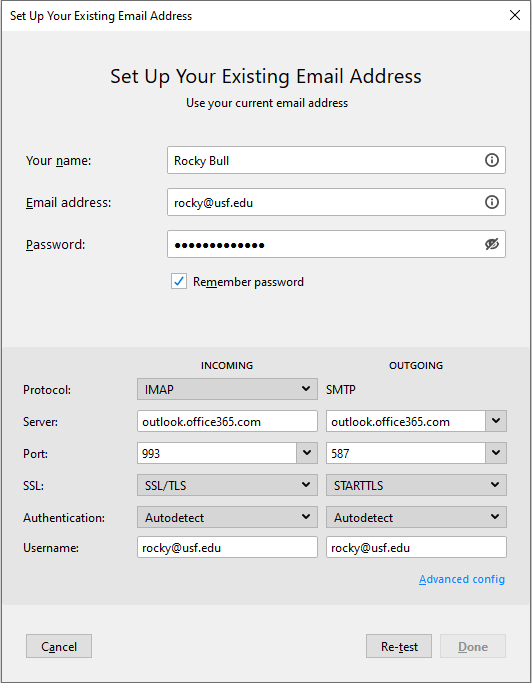
These instructions assume you are running a version of Thunderbird 77.0b1 or later which supports OAuth2 modern authentication. Click done. You should now be prompted in a new Microsoft style sign-in window for your login and MFA. If it is greyed out, click “re-test” first and confirm that all of the info is still correct.To set up a new account
To change the settings on an existing account
a. Server Name: outlook.office365.com
b. Port: 993
c. User Name: your @usf.edu email address
d. Select SSL/TLS from the Connection security dropdown menu
e. Select OAuth2 from the Authentication method dropdown menu
a. Server Name: smtp.office365.com
b. Port: 587
c. Select STARTTLS from the Connection security dropdown menu
d. Select OAuth2 from the Authentication method dropdown menu
e. User Name: your @usf.edu email address
If you are unable to solve your issue with this knowledge base article, please contact the USF IT Service Desk by using Chat at itchat.usf.edu, calling (813) 974-HELP (4357) or emailing help@usf.edu. If you find any errors or omissions in any knowledge base article, please contact and inform the USF IT Service Desk by calling (813) 974-HELP (4357) or emailing help@usf.edu.